1/18th Custom Diecasts
Re: 1/18th Custom Diecasts
Yeah... slightly... 
Give my umbrella to the Rain Dogs, for I am a Rain Dog, too.
- HUMVEE Driver
- Posts: 1316
- Joined: Sun Oct 17, 1999 4:18 am
- Location: Detroit area, USA
- Contact:
Re: 1/18th Custom Diecasts
Truly awesome work! Those came out so well, and they look totally MEAN but still realistic. Thanks for sharing!
-HUMVEE Driver
-HUMVEE Driver
"I'll see you on the road!"
http://www.madmaxmodels.com
http://www.madmaxmodels.com
Re: 1/18th Custom Diecasts
HUMVEE Driver wrote:Truly awesome work! Those came out so well, and they look totally MEAN but still realistic. Thanks for sharing!
-HUMVEE Driver
Thank you! I always aim for realism on my custom cars. I try to consider the practicalities of engineering vehicles in the post apocalypse (availability of materials, impact on fuel consumption, functionality in a rugged environment) when I build my models. And of course, intending them to be from the MM universe, I like them to have a mean look as well
Anyhow, here's the work I've done on the Yellow Cuda.

I added the rollcage and detailed the motor like I had planned. I decided shiny Mopar rally wheels with chrome trim rings just didn't look very MM, so I painted them into black steelies.

I also did some work on the interior, like swapping out the crappy little Ertl pistol grip for a bigger shift knob.
I added a few accessories, though I'd like to make some more. For now it's a tarp, a chain and a spare tire.

Here's a better view of the work I did on the exhausts. Also some weathering I added.

I wanted to detail the engine a bit more, so I added hoses, sparkplug wires, battery cables, etc.
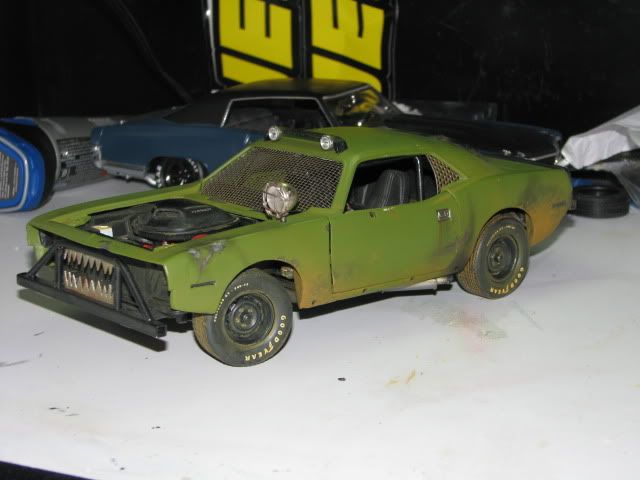
Since I went with a stripped-down concept for this car, I ditched the hood. I figured the hood was extra weight with the shaker hoodscoop already covering most of the important parts. Same idea applied to my replacing the windshield with a protective mesh screen. Or maybe the windshield got smashed out in a battle and the screen was the most practical replacement. Either way it looks cool and reminds me of a dirt stock car. Also gone are the headlights, replaced by the ones mounted on the bar on the roof (which I reconsidered after previously having decided not to use) and a spotlight.
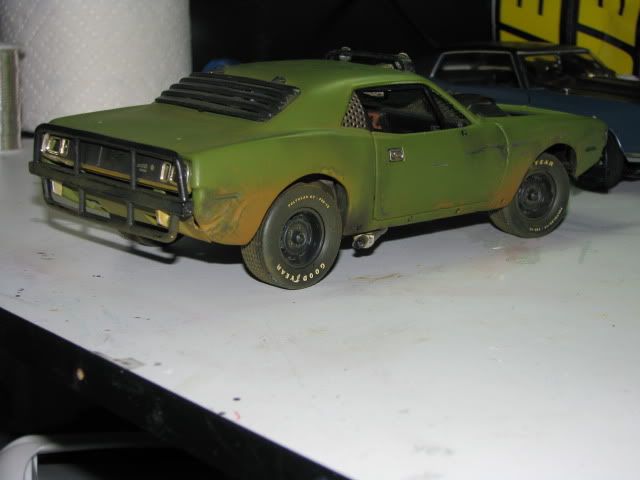
I kept the rear window louvers, which gives it sort of an armored look.
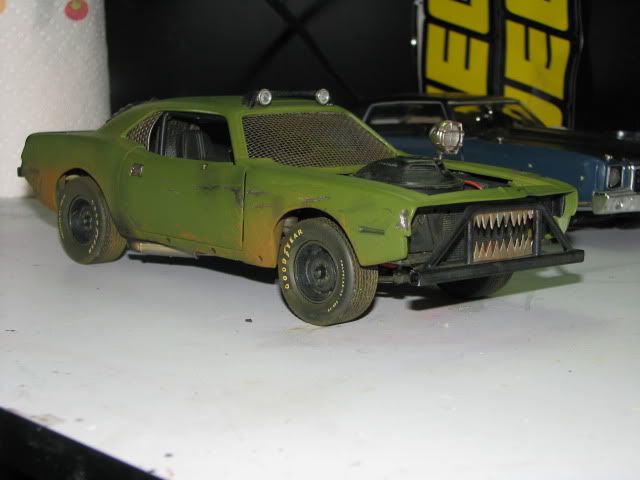
Another view of the right side. I'm pretty happy with how it turned out. The spotlight was a last minute idea just before I painted it. It's a 34 Ford headlight that I mounted on the top of the fender. I soldered together the protective grate out of wire, and ran the power cable for it through the mesh screen and into the side of the dash.
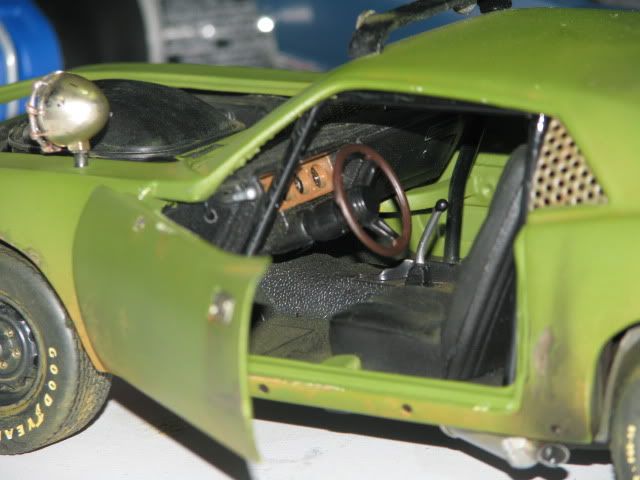
View of the interior. I installed the positioning handle for the spotlight on the side of the dash.
I'd still like to make some more accessories and add a fuel cell for extra storage in the trunk.
Next, I'm planning some more work on the 57 Chevy. I want to revise the front end and then it's getting some detailing and more paint.
- Big Bopper Bart
- Posts: 4910
- Joined: Sun Aug 15, 1999 3:50 pm
- Location: The ruins of South Florida!
Re: 1/18th Custom Diecasts
fanfraakintastic man! one gripe though is I'd add some kind of headlights to it.
 No.1 HELL RAISER on the MAD MAX Movies forum for over 10 years now !
Re: 1/18th Custom Diecasts
Thanks, Bart! I put the roof-mounted lights and the spotlight to make up for the lack of headlights on the front, so it could still be driven in the dark. Idk, I just like the looks of a bull bar with just a radiator behind it. To me it makes the car uglier, in a good way.Big Bopper Bart wrote:fanfraakintastic man! one gripe though is I'd add some kind of headlights to it.
As a side note, I've got a couple more 1/18 cars I'll be starting on, including a 78 Dodge Warlock and a 55 Chevy BelAir. But first I want to finish up the Red XA and the '57 Chevy.
Re: 1/18th Custom Diecasts
any progress yet? these are really awesome, your weathered BoB looks really well done, you deffo got skills
that is cundalini... and cudnalini wants his hand back!!!
Re: 1/18th Custom Diecasts
Hi, and thanks!weelz wrote:any progress yet? these are really awesome, your weathered BoB looks really well done, you deffo got skills
I did have a little bit of progress so far (the modelling bug has bitten me again as it often does this time of year).
On the '57 Chevy, I re-built the pushbar on the front and did a little more painting. The roof is now a rusted black color. There's still some more paint work to go, but the bulk of the major changes are all done.
I know I said I'd work more on the XA, but I admittedly got distracted with new project ideas. I bought a second 1/18 interceptor to keep clean and build a MM1 nose for, so i went ahead and cut off the nose on my weathered one to match the damage in RW. I cut it so it can be displayed on or off.
I also started some work on the 55 chevy, including detailing the motor, adding a bigger air filter/carb and re-routing the exaust through vertical stacks that go through the hood. I also added off-road style wheels and raised the rear suspension a little to give the car an aggressive rake.
On the Dodge Warlock, I'm still planning things out, but it's going to have big bogger tires on a lifted suspension, a rollbar in back, push bars, more lights, etc.
I have enough work to keep me busy all winter, but I really want to get the XA finished soon. Building side pipes is a challenge right now. I've attempted to make them from aluminum tubing, which deforms and snaps too easily for bending. Styrene tube gets really chewed up, too.
I will get some pictures of the various cars that are in progress soon.
Re: 1/18th Custom Diecasts
sounds like you've got your hands well tied down haha. have you left the bit on the corner of the interceptor? i noticed they haven't done that on the weathered version. i have a clean one myself and would love to get another cheep if i could and get it weathered somewhere near as good as yours as it looks 100X better than the ones you buy. wouldn't mind trying to make the landau too, its just trying to be creative as to what to use lol
that is cundalini... and cudnalini wants his hand back!!!
Re: 1/18th Custom Diecasts
Yep, I have plenty to do!weelz wrote:sounds like you've got your hands well tied down haha. have you left the bit on the corner of the interceptor? i noticed they haven't done that on the weathered version. i have a clean one myself and would love to get another cheep if i could and get it weathered somewhere near as good as yours as it looks 100X better than the ones you buy. wouldn't mind trying to make the landau too, its just trying to be creative as to what to use lol
On the RW interceptor I left the right corner of the nose attached and bent the corner of the bumper. I'll explain what I did in more depth once I get some pictures of it up (soon).
To me, given the inflated price of the weathered version, it's inaccuracies are unforgivable. It's an expensive, lazily made turd of a model in my opinion. The only improvement is the Dog figure. It wouldn't be hard to modify an interceptor yourself that's more accurate and better-looking. Definitely practice a little on weathering and give it a go on yours. Just use screen caps from the film and copy what you see as close as you can. The scene where Max stops after destroying the Landau and the buggy and the next one where he finds the gyrocopter are the best for reference on the weatheing. PM me if you need any tips. Oh, and ebay still has Interceptors that can be found for as cheap as $135 shipped (what I paid for my second one). They've gone up a little since they first came out, I think.
Once I'm done with all my current projects, I definitely want to try and build a 1/18th Landau. The '71 Mustang worked pretty well as a base for an XA, I wouldn't hesitate to use one again for building the Landau. I'm okay with the inaccurate donor car considering the price of a Mustang vs a Falcon model. Either way, it would certainly be one of the more challenging cars to build.
Re: 1/18th Custom Diecasts
it took me about 5 years to decide to buy the interceptor so i doubt ill be buying another anytime soon unless its for a steal lol. must say tho its the best £100 ive spent ever, i love it, look at it every time i walk in my room haha. but if i do decide to ill give you a shout so thanks for that. i couldn't imagine cutting up an autoart 'stang after paying £90 for too haha.can get a welly 70 boss 302 for about half the price so id probably have a go with that. ive not long been into modifying so im still finding my feet.
i need a lottery win and instead of buying real cars ill just buy loads and loads of models haha
i need a lottery win and instead of buying real cars ill just buy loads and loads of models haha
that is cundalini... and cudnalini wants his hand back!!!
